Craft stampers, card maker of the year award 2010

Craft stampers, card maker of the year award 2010

donderdag 16 mei 2024

For the "Let us entertain you" challenge at Lost Coast designs.

 
Today 2 cards for the challenge,
because I think both clowns really belong together.
Let me explain to you how these cards are made.

 I used these stamps:
Card #1
Card #2

Furthermore I used:
Black stazon
Distress oxide.
Twisted citron,
Lucky clover,
Cracked pistaschio,
Musterd seed,
Wild honey,
Crackling campfire,
Barn door.
Derwent colorsoft pencils.

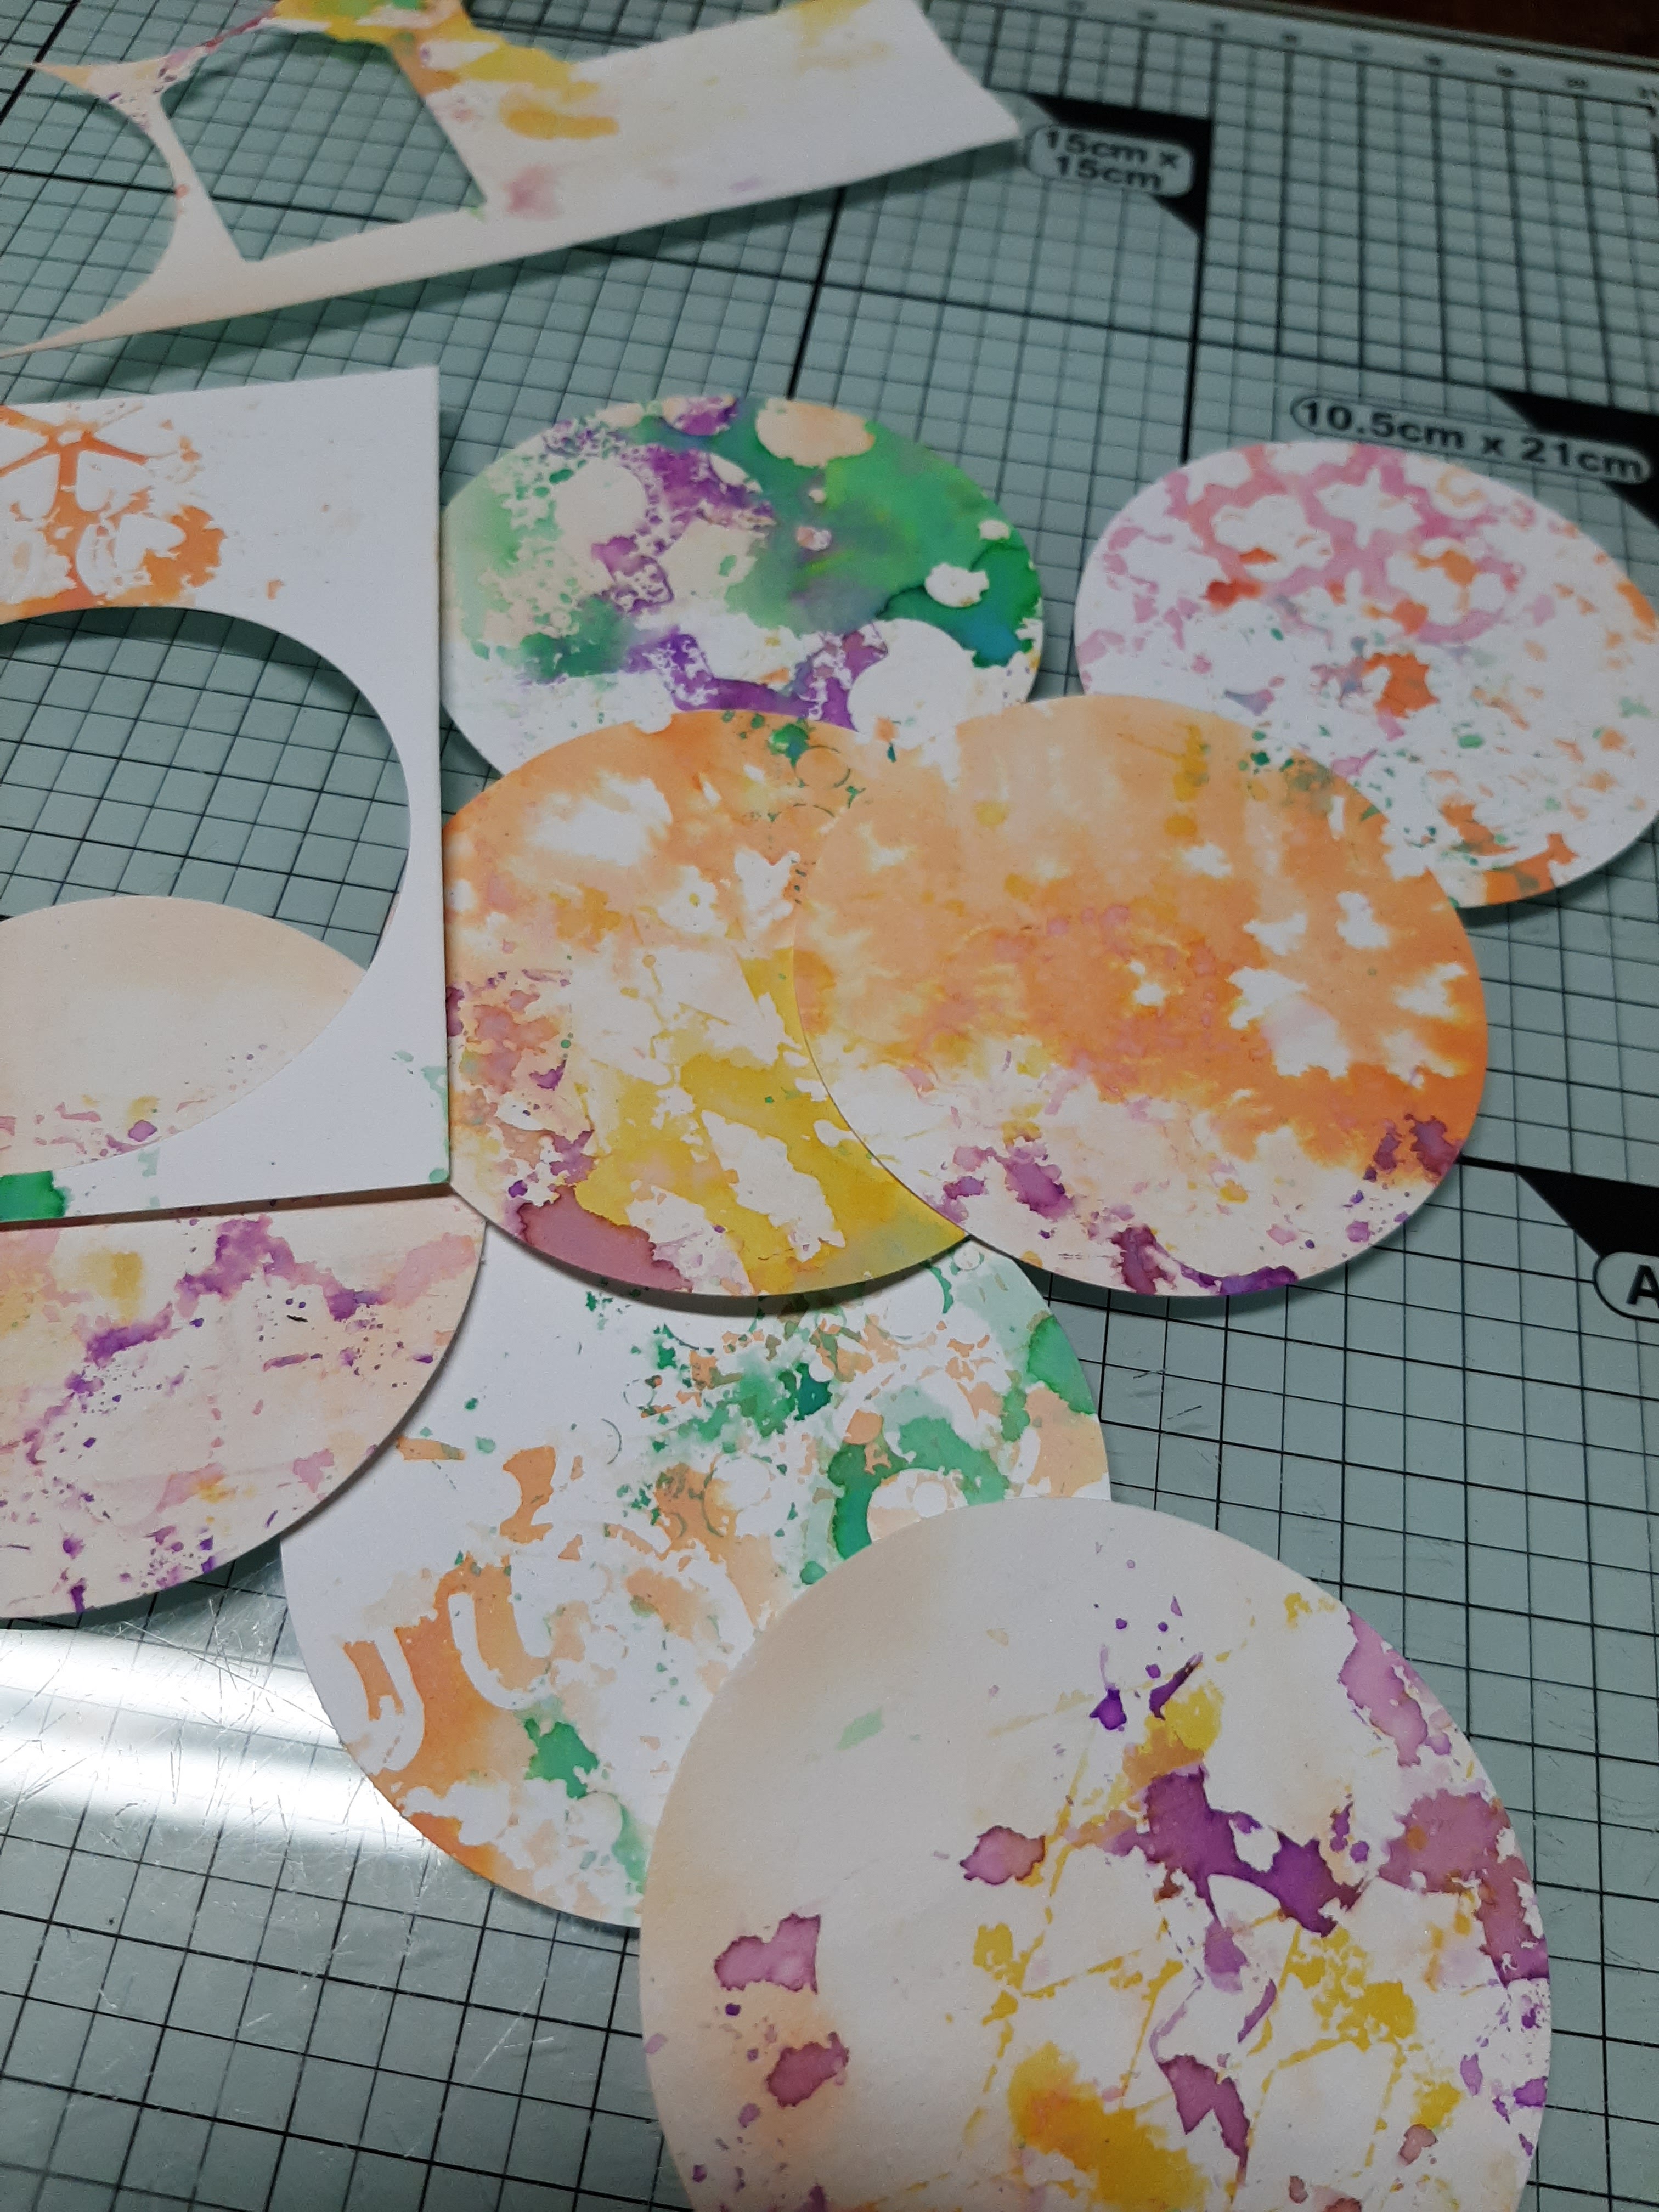
Take two pieces of paper measuring 20x20cm.
One for the orange background and one for the green.
We apply the colors with a brayer.
Starting with the light colors and working your way to the dark colors.
Be careful with the dark colors, apply small amounts.

With the sheet brush strokes, we now randomly stamp
 the orange tones on the green background.
And with the green tones on the orange background.
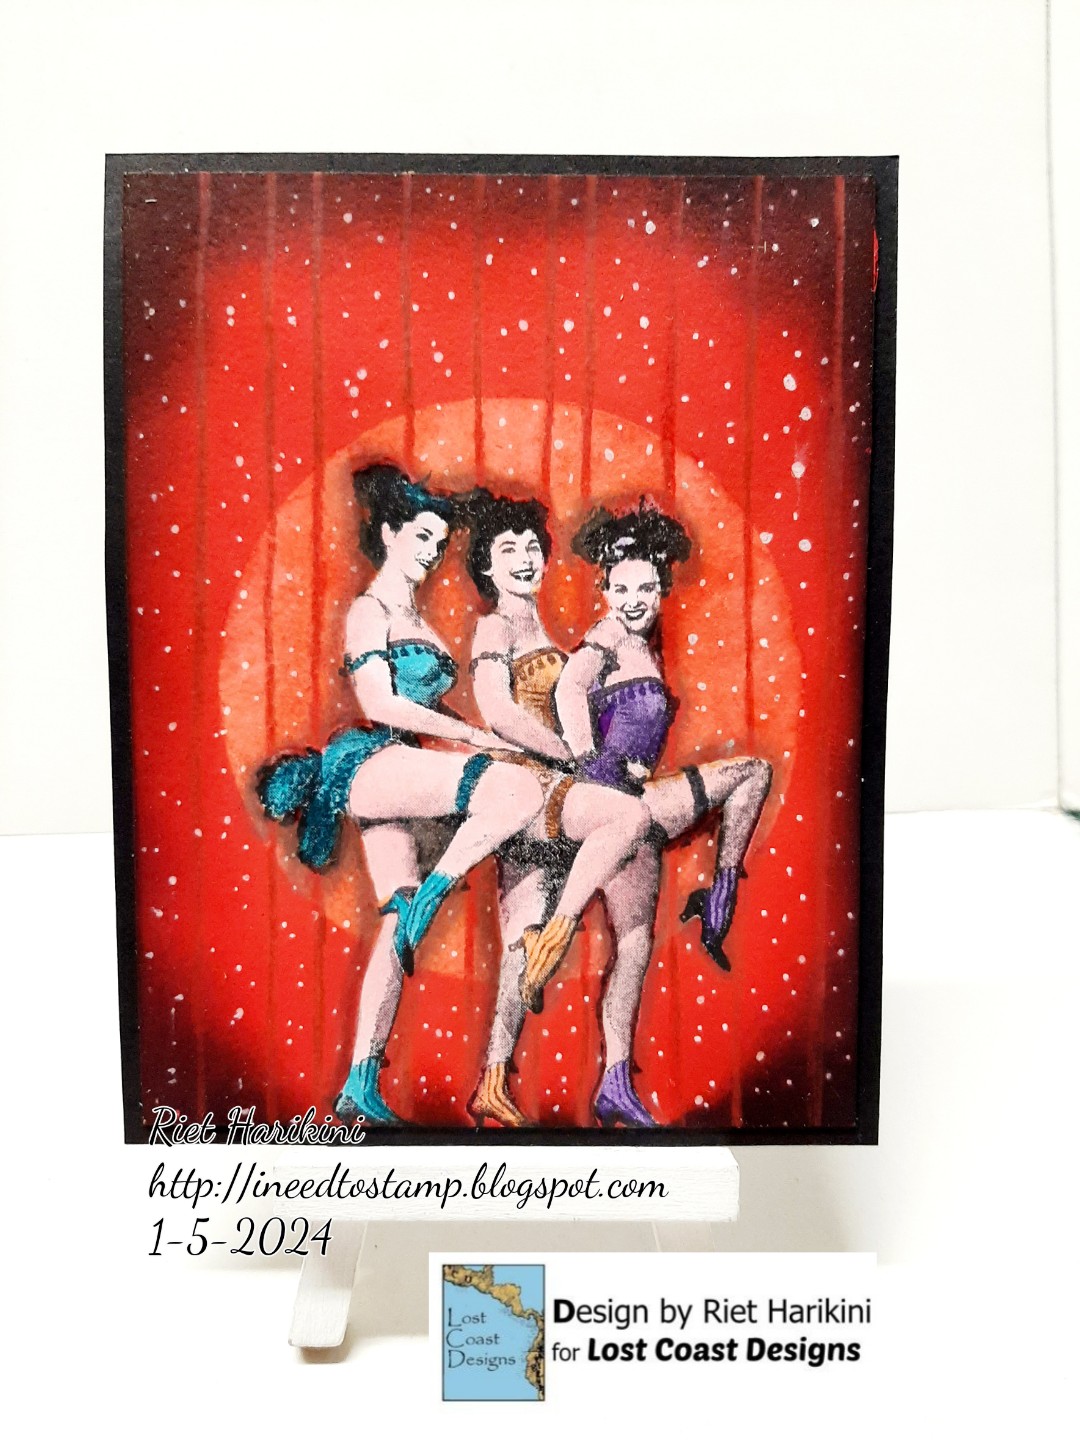
While we let this dry, we stamp the two clowns and color them.

When they ar colored you can cut them out.

Now choose a nice piece of background and cut it to 8.5cm x 8.5cm.

Now cut a piece of white cardstock measuring 12.5 x 12.5 cm.
And a double of 15 X 15cm.
We put the double card a side for a while.

Place the background on the white 12.5 x 12.5

Stamp the top left corner and bottom right corner,
 with the ledger stamp and the black stazon.
Repeat this with stamps from the Brush strokes sheet.
Use a stamping tool for this.

Now it looks like this.
Matt with a black cardstock with a 2mm edge.

Do the same with the second white card and glue them together.

Now use foam tape to stick the clowns on.

Now the card is ready.
The team would love to see your artwork in the LCD/CV challenge.
You can also participate with other brands of stamps.
You also have a chance to win new stamps, so join the challenge.


zaterdag 4 mei 2024

The new challenge at Lost Coast Designs/Carmens Veranda stamps is, "Let us entertain you".

 
Hello, today its my turn to show you something with entertainment.
So I thought of this beautiful stamp of a dancer.
I'll tell you how I made the card.
And if you like it you can participate in the challenge.
Maybe you will be the winner this month and win new stamps.

Stamps I used:

Distressink:
Pumice stone
Old paper
Iced spruce
Versafine onyx black
Gold leaf
and gold leaf liquid/glue.

I started with distress ink old paper and pumice stone to make the paper look old.

I made lengthwise spots on the background with a sheet of acetate and distressink iced spruce.

When it is completely dry, stamp the dancer with black ink.

Apply the gold leaf liquid to the stamp with a sponge.
Print it around the dancer and let dry.

Apply the gold leaf.
If this is your first time, you can first watch a video on You Tube.

Remove excess gold leaf with a coarse sponge.

Isn't that beautiful?
So pretty with the gold on the crackle background stamp.

This challenge is so much fun, 
it can be about theater, circus, show, tv, movies
and all kinds of other entertainment.
I'm curious to see what you come up with 
and hope to see your work in the challenge. 
Maybe you will be the new winner of new stamps. 
Good luck.


woensdag 1 mei 2024

New challenge at Lost coast Designs/Carmens Veranda stamps. "Let us entertain you"

Hi there, what a great challenge this is.
Let us entertain you can be something from 
theater, circus, dance, and all kinds of showbizz things.
I made a card with the dancing showgirls,
a stamp I use often.
Now here's how to make a stage with curtens and spotlight.

I used for this card:
Distressink 
Barn door,
Walnut stain
Black waterproof inkpad.
Posca white in 2 sizes.
Making tape.

How to make this card.
Start by stamping the showgirls in black.
Also stamp a maker and cut it out. Mask the print of the showgirls.
Sponge the entire card with Distress barn door.
Make a large circle mask as a spotlight and stick over the showgirls' mask.
Now sponge a 2nd layer with distressink barn through.
Allow to dry thoroughly and remove the mask from the circle.
Draw vertical lines with a dark red pencil, these should become the folds of the curtain.
Remove the mask from the show girls.
Make the edges a little darker with the distress ink walnut stain.
And with the posca pens we put many white dots on the curtain. 
The curtain thus appears to glitter in the light.
Matt on a piece of black cardboard.

So now its up to you.
Make something in this theme and join the challenge.
Maybe you ar oure next winner of new stamps.


This card is joining the challenge at:

zondag 28 april 2024

The cute and/or fluffy challenge at Lost Coast Designs/Carmens Veranda stamps is still running.

Hello everybody,
is still running on the Lost Coast Designs blog.
Last days, but you can still join.
I made a page for my art journal that I just started.
And I am so in love with this sweet white cat from Carmen's Veranda stamps.

What I used.

Washi tape,
Distressink,
Crackling campfire,
Twisted citron,
Forest moss, 
Evergreen bough.
Versafine Onyx black or any other waterproof black ink.
Markers or colorpencils.

Start by inking the largest stamp of the shadow frames
 with twisted citron and evergreen bough.
Spray a little water on it and print it on the paper.
Dry the paper well with the heat tool.
Looks so pretty, just like watercolor art.

Take 3 different washi tapes and stick them on.

Stamp with Forest moss and the stamp from the pieces of calligraphy sheet,
 on the right side of the green ink print.
1x at the top and 1x at the bottom.
The bottom print is upside down because the text runs nicely along the cat's body.
Because the cat is pasted over it later, you cannot see that the text is printed upside down.

We now stamp the crackle background with distressink 
Crackling campfire and Evergreen bough.
But only use a small part of the stamp.

Now the flowers and the cat.
Stamp them with black waterproof ink in the places where you want them.
Now take thin paper and stamp them on it again.

Color the flowers and cat and glue them on.

Stamp the sentiment with the black ink.
Give the words some orange accents.
And finally, take a green pencil and create
 some shadow along the washi and the cat.
And that's it, hope you liked it.

Feel free to leave a comment, I really like that.

The LCD challenge runs until the end of the month.
So there is still time to participate.
You can also participate with other brands of stamps. 
As long as your project is stamped.
See you next time, and don't forget, have fun stamping.

This A.J. is playing in challenge:

donderdag 25 april 2024

Cherry pie stamps creepy house.

Not yet halloween. But I love making these kind of cards.
The stamps ar from Cherry Pie.
I used Distressink.
musterd seed,
wiid honey,
spiced marmelade,
crackling campfire,
black soot.

Playing in the "Two old bats" challenge


woensdag 24 april 2024

the challenge at lost Coast Designs/Carmens Veranda stamps is "Cute and or fluffy".

Hello stampers and crafters.
I love this challenge, so cute!
 Today I have a card that is also very suitable for beginners.
But first I will tell you what I used to make the card.

The stamps:

Distressink:
Mustard seed
Wild honey
Kitch flamingo
Black waterproof ink pad
Derwent colorsoft pencils
Black fineliner
White gellpen
Stamperia stencil
Masking tape

To start, we make a puddle on your work sheet with a little water and the distress ink.
We run the paper through that.
Make sure you get interesting spots and don't make it too dark.
Allow to dry, possibly with a heat tool.
We start by stamping the mice with waterproof ink.
Make sure there is some distance between the mice so that the cat can sit between them.
Mask the mice with masking tape.
Now stamp the cat.
Remove the masks.
Now you would think that the colors of the background run through the animals.
But that's no problem, you will see that if you color with the same colors they disappear.
We use a white gel pen to whiten the cat's eyes and put a white dot in the pupils and on the nose.
We also make the scarf and the buttons on the mice's coat white with the gel pen.
Stamp the text at the top of the card in black.
Because my hands are quite shaky, I have difficulty drawing lines. 
So I drew the border with the handy stamperia mask and a black fineliner.

I rounded the corners of the card,
and glued the card onto black cardstock.
And this was it, a fairly easy card but super fun to make.
Of course with the beautiful stamps from Lost Coast Designs and Carmens Veranda Stamps.
Do you have a nice cute or fluffy stamp?
It may even be from a different brand, then join our challenge and have a chance to win stamps.
PLEASE read the RULES first, this way you avoid disappointments.
See you on the challenge, Hugs to all my readers.

Joining these challenges:

maandag 8 april 2024

Challenge #184 at Lost Coast Designs, "Fluffy and/or cute". I made a little ATC coin book.


Hi, dont you love this challenge, whell I do.
Cute and fluffy, well these little gnomes are so cute.
 The gnomes are a small version of the large gnomes from Lost Coast designs.


If you like to make ATCs or ATC coins, these are ideal for you.
They are the perfect size for ATC's.
I will explain to you how you can make such a nice ATC coin booklet.
But first, a list of supplies.

The stamps I used:

Other materials I used.
Distress ink.
Crackling campfire
Lucky clover
Peacock feathers
Wilted violet
Musterd seed
Versafine onyx black
Various stencils
Derwent inktense pencils
White gell pen
Acetate sheets
Circle punch and die.
Stencils.

I started making backgrounds.
By applying the ink directly to the stencils and spraying with some water.
Use the stencil as a stamp on your paper.

Look what a quick and fun result this technique gives.

Now punch the number of coins you want to make with a 2.5 inch punch.
My book has 7, because I wanted to make 6 but thought I would have one as a spare.
But I didn't have any mistakes or accidents this time, so I used all 7.

Stamp something on the background of the coins. 
Find something that fits the gnome well.
Stamp the gnomes on thin paper and gleu them on the coins.
The words come from the Misc words sheet.
Very handy to have, there is almost always a word that fits.

Since English is not my language, I find it difficult to explain this.
So I made a drawing with an explanation.
If you don't understand something, feel free to ask me.

Once you have made the page, 
glue an acetated window onto the circle on the inside of the folder.


Do this for every coin you have.

Now for the hinge and cover.
Follow the schedule on the drawing.
For those who have made a mini album before, this is the same way but smaller.
There are many videos on YouTube with clear explanations.
Fold the score lines and stick them with double-sided tape.

Make the cover and gleu the hinge in it.


Now we are going to attach the pockets to the hinge.

We leave the top open.
We stick double-sided tape on the flap at the bottom. 
But leave a cm free of tape on the hinge side.
Apply glue to the hinge and slide the pocket over it.
Press it well.
Now you can put the coin in the pocket.
Decorate the front and back of the cover as you like.
Don't forget to stick a ribbon in between to close the booklet.


I hope you enjoyed it and maybe make an ATC coin book yourself.


Now back to the "Fluffy and Cute" challenge.
This runs until the end of the month.
Maybe you have time to join us.
The team would really like that, and you have a chance to win new rubber stamps.
Don't forget to read the rules to avoid disappointment.
Good luck and see you next time.
Joining these challenges: